The LabPro interface has three buttons, three LEDs, four analog channels (CH 1, CH 2, CH 3, and CH 4), two digital channels (DIG/SONIC 1 and DIG/SONIC 2), a serial computer connection, a USB computer connection, a piezo speaker, and a calculator I/O port.
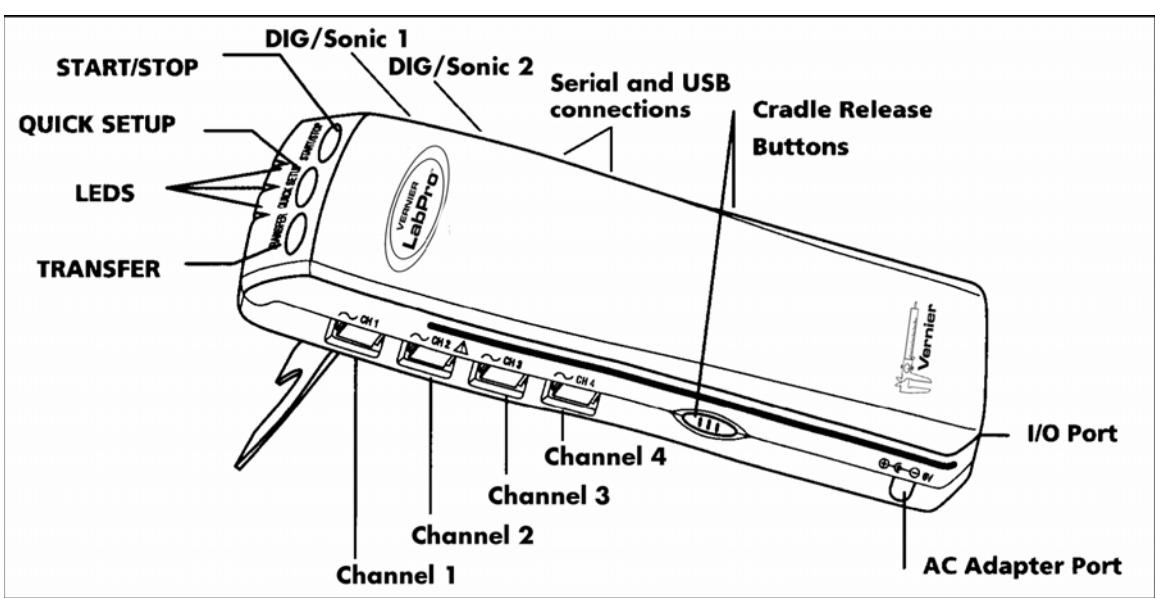
Buttons: The three buttons on the top of LabPro are used for the following purposes:
- TRANSFER begins transfer of calculator programs or applications (apps) between LabPro and an attached TI graphing calculator.
- QUICK SET-UP clears any data stored in LabPro’s memory, then polls all channels for auto-ID sensors and sets them up to collect data. QUICK SET-UP is used when neither a computer nor a calculator is attached to LabPro and works only with auto-ID sensors.
- START/STOP begins sampling for Quick Set-Up. Sampling continues until the default number of samples is collected or you press START/STOP again. This button also acts as a manual trigger for certain data-collection modes.
Lights
LabPro has three lights that indicate the LabPro status.
- Red indicates an error condition.
- Yellow indicates that LabPro is ready to collect data samples.
- Green indicates LabPro is collecting data.
Beeps
LabPro has a piezo speaker that makes four kinds of sounds or “beeps.”
- A “good” beep is a medium tone followed by a high tone.
- A “caution” beep is a medium tone followed by another medium tone.
- A “bad” beep is a medium tone followed by a low tone.
- A “tick” sound is made when a key is pressed.
Connecting Sensors
Sensors can be divided into two basic types—analog and digital. Examples of analog sensors are Temperature Probes, pH Sensors, Force Sensors, Oxygen Gas Sensors, etc. Up to four analog sensors can be connected to LabPro. Four jacks for the analog sensors (CH1-CH-4) are located on the same side as the AC Adapter Port. The analog ports accept British Telecom-style plugs with a right-hand connector. Examples of digital sensors are Motion Detectors, Radiation Monitors, Photogates, and Rotary Motion Sensors. Up to two digital sensors can be connected to LabPro. The digital ports (DIG/SONIC), which accept British Telecom-style plugs with a lefthand connector, are located on the same side as the serial and USB computer connections. Connect the sensor to the appropriate port. An important feature of LabPro is its ability to detect auto-ID sensors, and automatically set up an experiment. If you are not using sensors with the auto-ID ability, you can easily set them up with the experiments provided with the LoggerPro software.
Attaching LabPro to a Computer
The LabPro computer connection is located on the right side of the interface. The sliding door found there can be moved left to reveal the serial port or to the right to reveal the USB port.
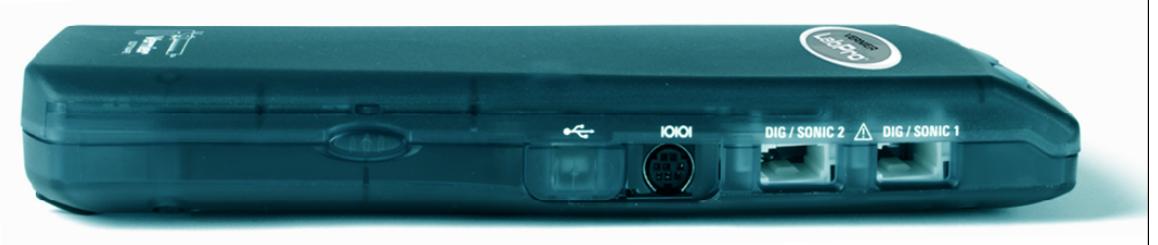
Serial Port and Digital Channels (USB Port is behind the sliding door)
Starting Logger** Pro **Software and Preparing to Collect Data
Locate the Logger Pro icon on your computer and double-click on it. An important feature of LabPro is its ability to detect auto-ID sensors, and automatically set up an experiment.3 If Logger Pro does not detect your LabPro and/or a sensor is not connected, the Collect button will be faded. Choose Connect Interface from the Experiment menu. The computer will attempt to communicate with LabPro. If you see the following message4, then Logger Pro is having trouble communicating with LabPro. Select the correct port or check your current port and click OK.
If you have connected a Stainless-Steel Temperature Probe and the computer has detected the LabPro interface, for example, you will see the following screen, which shows a graph of Temperature vs. Time along with the current reading at the top.
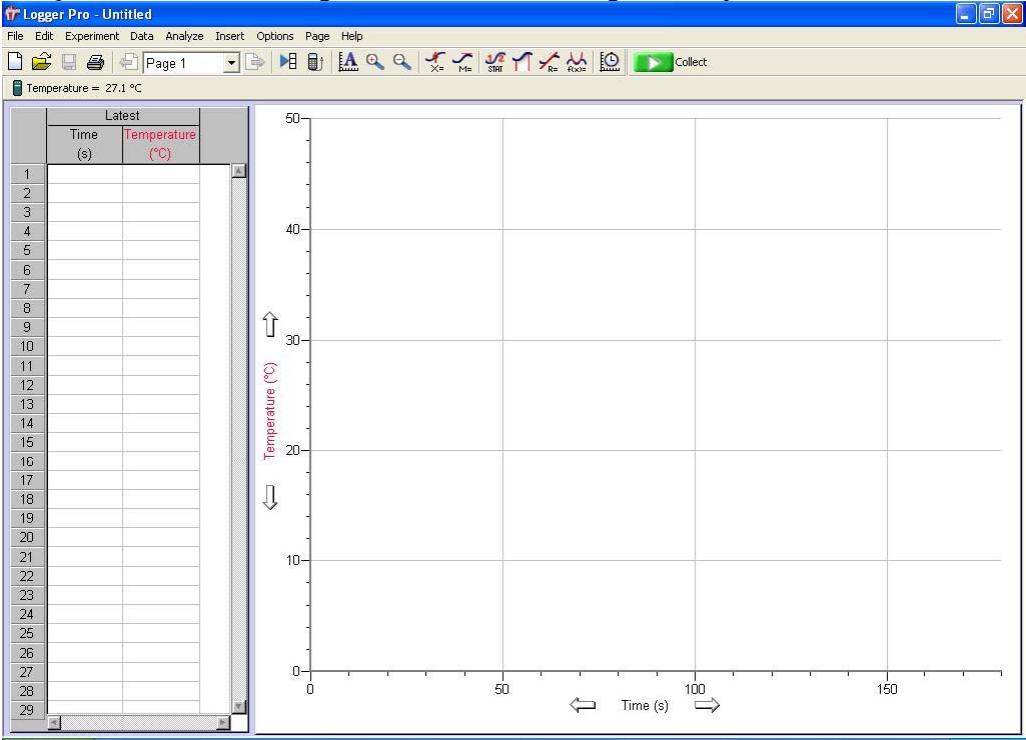
1001 Appendix B : Page 2
Notice how the program automatically identified the temperature probe (an auto-ID sensor). The current temperature reading is displayed in the status bar at the top of the screen. The default data collection mode is time graph. In this example, you have a Temperature Probe, reading in Celsius, and collecting data as a function of time for 120 seconds. If you now disconnect the Temperature Probe, connect a different auto-ID sensor, and choose New from the File menu, Logger Pro will set up a new experiment for the new sensor.
Tutorial: Temperature Measurement with Logger Pro
A good way to get acquainted with LabPro is by performing a simple experiment. Using this tutorial, you will take measurements using a temperature sensor. Follow the simple steps and you are well on your way to collecting and analyzing data with a computer.
Materials
Computer & LabPro interface Vernier Stainless-Steel Temperature Probe One 250-mL beaker or cup 100 mL hot water
Procedure
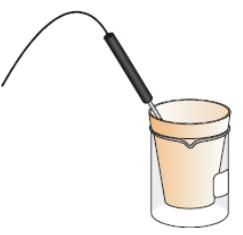
Place about 100 mL of hot water into a 250-mL beaker or a cup.
Plug the Stainless-Steel Temperature Probe into channel CH 1 on LabPro, and lay the temperature probe on the tabletop.
Start the Logger Pro software. Logger Pro will detect the auto-ID sensor, set the data collection parameters, and computer display. In this case, collection parameters are 1.0 sample per second and 120 samples. The program displays a graph and data table on the computer. The vertical axis of the graph will have temperature scaled from 0 to 100°C. The horizontal axis will have time scaled from 0 to 120 seconds. You are ready to collect data.
Click GO to begin data collection.
Wait about 10 seconds and place the Temperature Probe into the cup of hot water, as shown above. Allow Logger Pro to complete data collection.
Notice that the sensor does not read the new temperature instantly; it takes a moment to respond.
Now that the run is complete, pull down the Analyze menu and choose Examine. The cursor will become a vertical line. As you move the cursor across the screen, temperature and time values corresponding to the cursor position will be displayed. Move the cursor to the point when the probe was first placed in the hot water. Record that time. Move the cursor to find the highest temperature, and record that time. How long did it take for the temperature sensor to stabilize at the water’s temperature? This tutorial is an example of how easy it is to collect and analyze data with LabPro and a computer. The auto-ID Stainless-Steel Temperature Probe simplified the experiment setup, but the use of non auto-ID sensors is almost as easy. All you have to do is connect the sensor or sensors, and open up an appropriate experiment file. Logger Pro software has over 500 experiment files. This set of files is also includes experiments in our lab books.